

Updated 8-30-19
This post explains the bakeout procedure to improve base vacuum in a PHI 5600 X-ray photoelectron spectrometer. The procedure is basically the same for most of the older PHI (Physical Electronics) Spherical Capacitive Analyzer XPS surface analysis systems.
PHI X-ray photoelectron spectrometers generally have built-in radiant heaters as well as heaters under the magnets in the ion pumps that heat the system up to a maximum of 200 degrees Celsius. After the system is prepared for bake-out, a heat-insulating blanket is put over the vacuum chamber to trap the heat generated by the heaters. Bakeout times are typically 12 to 20 hours depending on the amount of water vapor in the chamber, which in turn is directly proportional to how long the vacuum chamber has been up to air.
The system should be pumped down with the ion pumps and the vacuum should be in the low 10-7 Torr range or better before starting a bake-out. The only exception is when you are baking out new ion pumps into the turbo pump; this is explained in more detail below. Just follow these steps and refer to the pictures:
- Remove any samples from the chamber that should not be baked out. These include samples that are mounted with carbon or silver tape, and gassy samples. Metals and semiconductors are OK to leave in the chamber.
- Make sure that all the valves on the AVC are closed, and that the turbo pump is off.
- Turn off the card rack power
- Turn off the ion gun control, X-ray source control, and any other controls that may have filament or high voltage. The only units that should still have power are the Boostivac ion pump control, AVC (auto valve control) and the DGC III ion gauge control.
- Remove all of the cables to all optics units on the vacuum chamber, with the exception of the ion gauge control cable, which is bake-able and remains connected at all times. The cables that should be disconnected include those for the X-ray source, ion gun, neutralizer, and electron gun if so equipped.
- If the system has motors on the stage, remove them. If your system is a 5000 series LS (large sample) put the stage in the bake-out position before you remove the motors.
- Drain the water out of the standard X-ray source (if so equipped) by first disconnecting the IN water line from the source but keeping the OUT water line connected. Then, remove the IN water coupler. Gravity will draw the water out of the X-ray source in about 20 seconds. Once the water is drained out of the source, disconnect the OUT water line and reconnect the IN water coupler to the source.
- Remove the water cooling lines and HV connection on the standard source and the second half of the shroud. Cover the water swag lock fittings with aluminum foil.
- If the system has a monochromator, set the shield aperture to mid-range. This will help prevent any coating during bake-out to occur on the monochromator crystals and will also help reduce to direct radiant heat on the surface of the crystals.
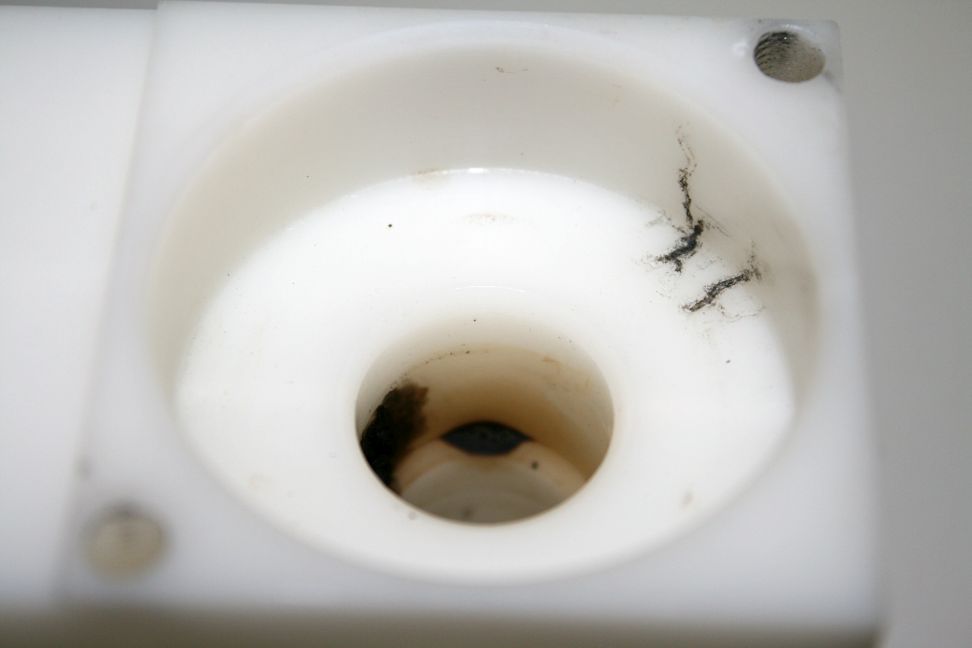
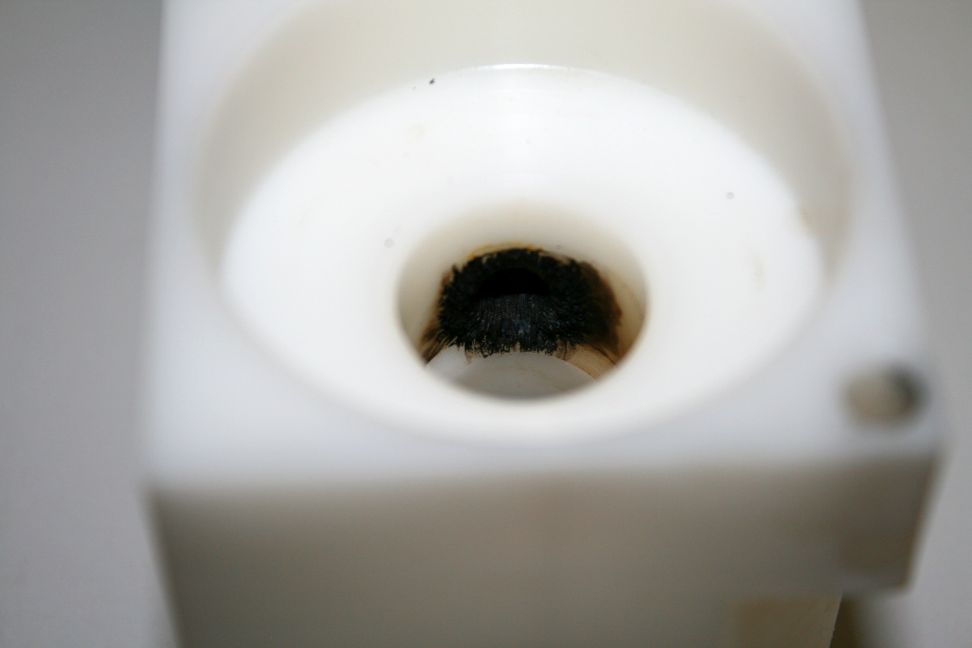
- Remove the 10-610 monochromator X-ray source cover, Teflon block, base (first remove the HV connector), and water o-ring seals. Note that a stubby 3/4″ open end wrench works best to remove the nut on the HV connector. Home Depot carries the Tekton brand 3/4″ stubby combination wrench. The O-ring seals on the mono anode need to be removed or they will dry out during the bake-out, which in turn may cause a variety of problems including water leakage and leakage current on the mono X-ray source. Removing the O-rings before bake-out and coating them with some vacuum grease will prevent them from drying out and causing these leaks. This is VERY IMPORTANT! See the pictures below which show how the Teflon block can get burned and cause electrical leakage if the O-rings are not removed for the bake out.

- If the system has a microscope, remove it by unscrewing the collar and lifting it out of the base. Do not move or remove the base as that will make it much more difficult to realign the microscope to the focal point of the SCA after the bake-out.
- While wearing lab gloves, wipe the system down with some isopropanol to remove any oils or other contaminants. I use isopropanol since is it readily available and relatively safe, but any degreasing agent should work. Once the system is baked out, any oils from finger prints or hand prints left on the surface of the chamber may become permanently etched onto the chamber.
- Cover all of the viewports, exposed connectors and feedthrus with aluminum foil. This helps to even out the thermal conductivity during the heat-up and cool-down cycles.
- Remove the table tops that are near the vacuum chamber. The 5100, 5300, and 5400 type vacuum consoles are integrated with the electronics console so only the tabletops near the vacuum chamber need to be removed. On the 5600 and later systems, the vacuum console is separate so the table tops on the vacuum console need to be completely removed.
- Pull up the table top interlock switches. These are designed to prevent the bake-out heaters from turning on unless the table tops have been removed.
- Put the blanket over the chamber; it is recommended that you wear a mask during this process. The blanket may be one piece or two or more pieces that are connected with Velcro. I recommend gloves and a lab coat if possible as the older blankets are aluminized fiberglass and the fibers itch. Also, if are not able to wear a mask, try not to breathe the fibers in as you put the blankets on.
- The V1 gate valve, turbo pump (if mounted to the load lock) and the monochromator crystals should be outside the blanket. If there are any gaps in the blankets, use aluminum foil to cover them.
- If the system is not equipped with a cooling fan for the V1 gate valve, use a floor fan set on low to provide cooling to the V1 gate valve. The vacuum chamber will reach temperatures as high as 200 degrees Celsius, but the gate valve can only be baked to 150 degrees Celsius.
- Verify that set point 4 on the DGC III ion gauge control is set to 3 X 10⁻⁶ Torr.
- Make sure the Boostivac ion pump control is set to the run position. That makes sure that the Boostivac will turn off if the outgassing of the system gets higher than the low 10-5 Torr range.
- Set the bake-out timer to 12 to 20 hours and press the bake-out power button (on earlier 5000 series systems there is a bake-out power circuit breaker instead of a switch).
- After the bake-out is complete, let the system cool down to room temperature. Then remove the bake-out blanket(s) and replace the table tops and reconnect the cables to the system. The x-ray source, ion gun, electron gun, neutralizer and electron multiplier all need to be outgassed. Refer to the manual for each of those components for the out gas procedure. Or, contact us at RBD Instruments dot com technical support for more information.
NOTE: Make sure that the HV connector on the mono source is tight as if it is loose you can have arcing.
Turbo pump baking notes:
If you are baking the system into the turbo pump the ion pumps are not on and you will be pumping on the chamber during the bake-out.
For turbo bake out V1 and V3 are open, the ion pump is OFF. Set-point 1 on the DIG III ion gauge control needs to be set to 8 X 10⁻⁴ Torr. Set-point 4 is set to 5 X 10⁻⁴ Torr. Typically turbo pump bake outs are set to 4 hours, just enough time to get the water vapor off the ion pump elements. After the turbo pump bake out is complete, let the system cool down and start the ion pumps. Then close V1 and V3 and set the DIGIII set-points back to normal (set-point 1 = 5 X 10⁻⁵, set-point 4 = 3 X10⁻⁶ Torr) and give the chamber a normal bake out.
The photos below show the steps of the bake-out procedure.
If you do not want to use a bulky bakeout blanket to desorb water vapor, check out some other options from RBD Instruments.
-

- 5600 XPS system with mono
-
- side view of XPS system
-
- drain xray source water
-
- standard xray source housing
-
- remove water line couplers
-
- standard source ready for bakeout
-
- monochromator
-
- monochromator shield aperture
-
- remove mono block
-
- remove mono orings
-
- remove mono base and rubber insulator
-
- mono anode
-
- system microscope
-
- system microscope removed
-
- wipe down chamber with Isopropanol
-
- cover viewports
-
- window covered with aluminum foil
-
- covered with aluminum foil
-
- mono anode covered with aluminum foil
-
- remove tabletops
-
- tabletops removed
-
- pull up tabletop switches
-
- bakeout blankets on chamber
-
- digiii setpoint 4
-
- boostivac set to run
-
- bakeout timer and power switch
-
- cooling fan on gate valve
-
- xray source bakeout shortcut

If your bake-out blanket has a cut out for the standard X-ray source, you can take a short cut by draining the source and then remove the couplers from the top of the source. Then just stick the source out through the hole in the blanket. This saves you the trouble of disconnecting and reconnecting the water cooling lines. I have added a photo that shows this shortcut.