
The ceramic feedthroughs on the nude ion gauges commonly used in vacuum chambers can become coated over time which results in non-accurate or unstable readings. The following procedure can be used to clean the coating off of the ceramics. Install a new filament assembly on the clean feedthrough flange and voila! – You have a rebuilt ion gauge. RBD provides the filament assemblies for a wide variety of ion gauges. If you can’t or don’t have the time to clean the feedthrough assembly on your coated ion gauge, RBD also provides complete ion gauges at great prices. The RBD Instruments ion gauge filaments and complete gauges can be found at this link – Low Cost Ion Gauge Filaments

Ion gauge cleaning procedure
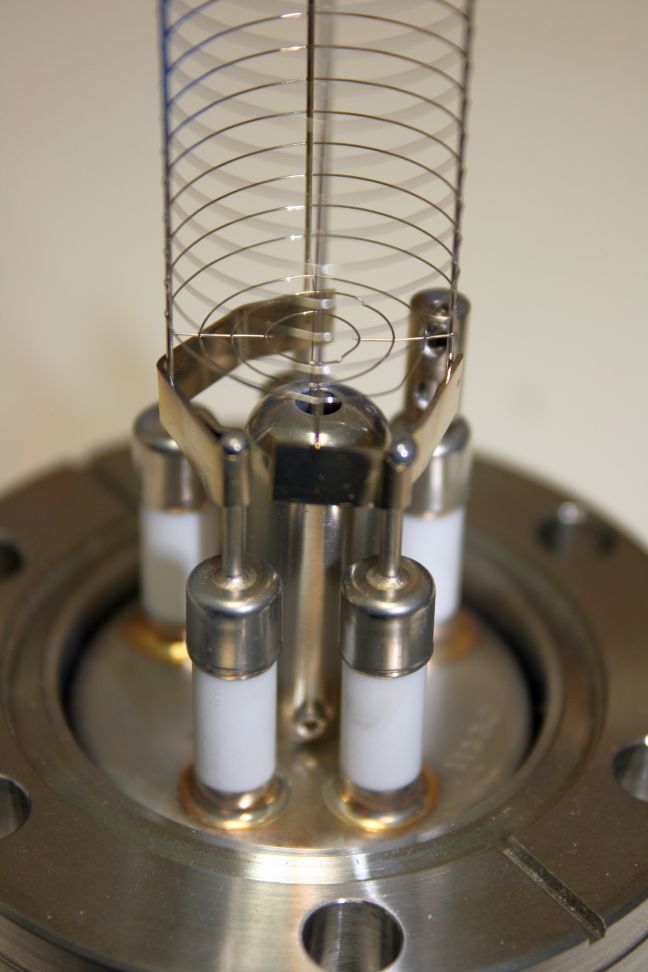
Note: This procedure can be used to clean the tungsten and carbon coating off of the ion gauge ceramic feedthroughs. It is not intended for ion gauges that are contaminated with oil. If your ion gauge is contaminated with oil it should be replaced.
- Tape a used gasket to the flange. This is to ensure that the knife edge is protected (rule # 1).
- With the ion gauge flange pointing down, sandblast the ceramics with clean alumina. Avoid the grid.
- With the ion gauge flange pointing down, sandblast the ceramics and metal can with clean glass beads. Avoid the grid.
- With the ion gauge flange pointing down, move the sand blast nozzle as far away from the ion gauge as possible and sand blast the grid lightly with clean glass beads to remove any black contamination from the grid. You not want to get the nozzle too close to the grid as the air blast will damage the grid and or bend the collector wire.
- Shake off any excess blast material.
- Rinse off the ion gauge flange with water.
- If necessary, straighten any of the grid wires that may be bent out of position
- With the ion gauge flange facing down, place the ion gauge into a beaker filled with 5% Alconox or another lab detergent and water. Ultrasonic for 5-10 minutes. Warm water works best.
- Remove from beaker and rinse well with water.
- Place ion gauge flange face down in a beaker of DI water with no soap.
- Ultrasonic for 5-10 minutes
- Remove from water and rinse thoroughly with DI water.
- Dunk once into Isopropanol (to remove the water).
- Blow off excess Isopropanol (especially from inside the cap where the collector wire is located) and then dry in an air oven for 1 hour at up to 200C.
- Install new filament assembly.
Rebuild is complete!
When you install the ion gauge back into your vacuum chamber you will need to run it through one or two degas cycles.
Also check out the RBD Techspot blog post on how to install an ion gauge filament.